Overview
As a Xinet administrator, it is up to you to decide how individuals or groups interact with Xinet volumes. This can be done on a volume basis for each user if you choose.
This article shares the process of giving users access to the Xinet volumes.
DISCLAIMER: The personal contact information in this article is fictitious and purely meant for instructional purposes.
Process
- Go to VOLUME/USERS > User Volumes > new volume.
- Configure a user's permissions for Xinet access to a volume by selecting the needed information in the following fields:
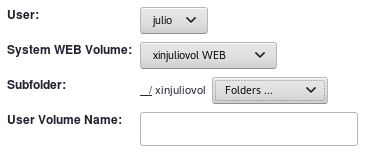
- User: This dropdown allows you to choose the user.
- System WEB Volume: This dropdown allows you to choose the web volume. It contains all the volumes on the server on which Xinet is enabled. You can also constrain access to a given sub-directory if you want.
- Subfolder: This field is optional. In some cases, you may want to limit a customer's access to a subdirectory or folder within a volume. You can select a subfolder from the dropdown and go as deep as you want.
For example, choose a subdirectory within a subdirectory and create new subfolders as needed. The interface displays the current path beneath the dropdown. This path is interactive and allows clicking on its segment for faster navigation. - User Volume Name: What you type here establishes the name of the volume or subdirectory that the user will see on your website.
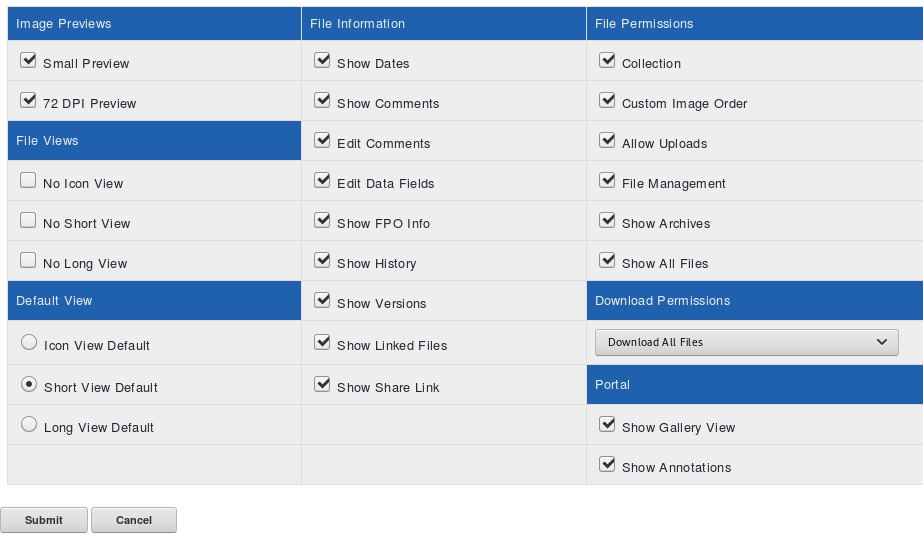
- Configure the following permissions for accessing the Xinet volume:
-
Image Previews
- Small Preview: This option determines whether the users see small previews for the images. Small previews are, at most, 112 pixels either horizontally or vertically. Users see these previews by default in Xinet's short view. Without small previews, the images display a custom preview icon or possibly 72-dpi previews.
- 72 DPI Preview: This option determines whether you allow users to view the large previews of the images. The 72-dpi preview is useful for customers who wish to download the web-ready images for use on their websites. You may want to turn this feature off if you want to charge customers for the web-ready copies.
-
File views
- No icon view: This option determines whether the browsing users can view files in Xinet using the icon format. This view shows files and folders together with a Mac-style icon displayed for each item.
For images, a custom icon is generated from the image data. While the non-image files display the icons of the application that created them, clicking an icon brings up more information about the file, and clicking a folder opens the contents of that folder in the browser.
- No short view: This option determines whether the browsing users can view files in Xinet using the short view format. In this view, all subfolders of the current folder are displayed first, with an icon next to them. Clicking a folder name displays the contents of the files in the folder in a table.
The file names appear first in the tables. If available, they display a 112x112 pixel preview. If not, the icons of the applications that created those files display instead. Below this preview image, a set of options show for displaying the folder contents. The availability of these options depends on the permissions of the connected user.
- No long view: This option determines whether the browsing users can view files in Xinet using the long view format. This view displays each file in the folder contents with its details and a 112x112 pixel preview. You can add items to your Collection when viewing files this way.
- No icon view: This option determines whether the browsing users can view files in Xinet using the icon format. This view shows files and folders together with a Mac-style icon displayed for each item.
-
Default View
- Icon view default: This setting means that the Xinet users see the information in the icon view format by default when beginning Xinet sessions.
- Short view default: This setting means that the Xinet users see the information in the short view format by default when beginning Xinet sessions.
- Long view default: This setting means that the Xinet users see information in the long view format by default when beginning Xinet sessions.
- Icon view default: This setting means that the Xinet users see the information in the icon view format by default when beginning Xinet sessions.
-
File Information
- Show Dates: This option determines whether the last accessed, modified, and created details display for files.
- Show Comments: This option determines whether the users see the comments field in the image information windows and Xinet's long views. All Xinet users see the comments unless you choose to suppress them.
- Edit Comments: This option determines whether the Xinet users can change the information that appears in the comments field and the long view.
- Edit Data Fields: This option determines whether users can edit Xinet data fields. When enabled, it overrides conflicting editable settings in the Permission Set.
- Show FPO Info: By default, each Xinet FPO includes information about itself and its corresponding high-resolution image. You can suppress this information if the customers are not interested in FPOs, or you do not want to reveal this information about the high-resolution images.
- Show History: This option only works in conjunction with the database. Use it if you want Xinet users to have access to the detailed activity history of files on the server. When the option is activated, a Detailed History button appears in Xinet information windows. Clicking this button displays the detailed history of the file, including information about the actions performed on it with the dates, the users who performed them, and the users' IP addresses.
- Show Versions: This option allows remote users to see various versions of files through web browsers. You can change which of these versions is the 'current version' for production use or download.
-
Show Linked Files: This option allows Xinet users to find and see previews of all the documents which are using the selected image (even if it is archived) with a visual summary of its stored information in the database.
By default, when engaged, this option displays all levels of linked child and parent files and, optionally, may affect how the child locks are applied when the Xinet Portal Asset Timer module has been engaged. However, the Xinet database must be enabled on the volume where the images of interest reside. The option also operates on:- InDesign files that are saved with the Xinet plugin enabled;
- PDFs that have been generated with the Annotator (Interactive PDF) plugin when using Xinet and contain OPI comments; and
- Each image layer in the PSD files.
- Show Share Link: When activated, this option allows sharing assets with other users.
- Show Dates: This option determines whether the last accessed, modified, and created details display for files.
-
File Permissions
- Collection: This determines whether customers can use the 'Collection' feature and its plugins for batch downloading and conversion of files.
- Custom Image Order: When activated, this feature allows customers to download images scaled to the size/format that they need for a particular purpose. The server keeps track of these activities in its Xinet access log. The web access logs also provide information about looking at logs of custom-ordered images.
- Allow Uploads: This option determines whether the customers can use Xinet to place files on the server. For example, a customer might download FPOs, place them in an InDesign document, and then want to put the document on the server for approval and production.
The customer may type in the name of the file or use the Browse button to point to the file. In many cases, users want to set up a separate volume for uploads. Please note that this option needs to be turned on if your clients will be uploading files on the volume.
- File Management: This option allows the end-users to create, move, rename, and delete files and folders in their Xinet volumes.
- Show Archives: This option determines whether you allow users to see and search for the archived files.
- Show All Files: If this option is not enabled, users only see the image files. Xinet considers any file for which it makes FPOs to be an image file. If you turn off FPO generation for any type of file, Xinet does not consider those files to be images and does not, therefore, show them unless you also enable this option.
- Collection: This determines whether customers can use the 'Collection' feature and its plugins for batch downloading and conversion of files.
-
Download Permissions: The following options allow you to specify the kinds of files each user may download from the Xinet server:
- Download All Files: This option allows the users to download all files on the specified Xinet volume.
- Download All Files Except Hi-Res Images: This option allows the users to download FPOs, layout files, and other files for which FPOs are not generated. Keep in mind that the custom image orders do not work correctly without the ability to download high-resolution images.
- Download Non-Image Files and Low-Res Video: This option allows the users to download non-image files such as page layout files, spreadsheets, and low-resolution video files.
- Download Non-Image Files: This option allows the users to only download non-image files such as page layout files and spreadsheets.
- Download All Files Except FPOs: This option allows the users to download high-resolution images but not their corresponding FPOs. The users can also download many other kinds of files (for example, InDesign or Excel files) for which the Xinet server does not create FPOs.
- Download All Files Except FPOs and Low-Res Video: This option limits the users from downloading FPOs and low-resolution video files.
- Download FPOs only: This option allows the users to only download FPOs from the Xinet server.
- Download Low-Res Videos Only: This option limits the users to only download low-resolution video files.
- Disable Downloads: This option means that the user cannot download files of any type from the Xinet server.
-
Portal
- Show Gallery View: This option allows the users to review visual snapshots of assets while browsing through the directory structure in the portal browser window. This option can be configured for individual user volumes or all volumes for a selected site.
- Show Annotations: This option allows users to view the annotations added to the assets, if any.
- Show Gallery View: This option allows the users to review visual snapshots of assets while browsing through the directory structure in the portal browser window. This option can be configured for individual user volumes or all volumes for a selected site.
-
Image Previews
- Once you have finished configuring the volume attributes for the user, click the Submit button, as seen in the screenshot below.

Priyanka Bhotika
Comments